

Incapsula IP Protection secures multiple service types and protocols, in addition to protecting customers who don’t have an entire Class C subnet. When onboarding, customers receive a protected IP address from Incapsula, which inspects and filters all incoming traffic. A redundant, secure, two-way generic routing encapsulation (GRE) tunnel is used to forward clean traffic to the origin IP and to return outbound traffic from the application to your users. Once the onboarding process is complete, the only way scrubbed, legitimate packets can reach your network servers from the Incapsula network is through the GRE tunnel, so you’ll need to configure a tunnel between Incapsula and your gateway devices. If you want more background on why Incapsula uses GRE tunnels, read Why Does Incapsula Use a GRE Tunnel?
Individual IP address protection is ideal for gaming servers and SaaS applications, which have high-traffic, critical non-HTTP assets with low IP counts, and for cloud deployments looking for direct-to-IP attack prevention.
In this article, we explain how to configure a generic routing encapsulation (GRE) tunnel for Incapsula IP Protection on an Amazon Web Services Ubuntu Linux instance. Ubuntu is by far the most popular operating system available on AWS, with more instances in use than all 11 other available operating systems combined. We’ll follow up with an example of configuring a GRE tunnel for a Cisco router. For specific installations such as Juniper SRX240, Ubuntu client, Centos client, Centos client on AWS , and Fortinet, please contact us.
Establishing the GRE
Before you establish the GRE, note the example screenshot below that shows you the five IPs you’ll be working with. Incapsula will provide you three IPs labeled “Incapsula Public IP”, “Customer Private IP” and “Incapsula Private IP” that will be used, together with the “Customer Public IP” to configure the GRE. The address labeled “Incapsula Protected IP” in the screenshot is the new protected IP address from Incapsula that will be allocated to your server and used to send and receive filtered traffic.

Please note when you are configuring you’ll need to replace the text in bold with the requisite addresses you received.
Use these steps to configure and activate a GRE tunnel on your AWS Ubuntu instance:
1. Use the Amazon EC2 console to determine the EC2 Public IP Address or the EC2 Elastic IP Address assigned to your Ubuntu server instance
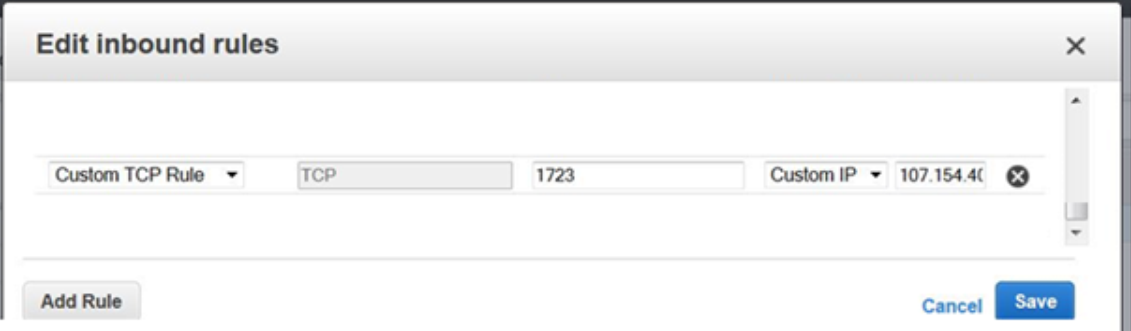
2. In the AWS security policy, you need to open port 1723 to the Incapsula Public IP. (See screenshot above for reference.)
And add it to a new Source entry in the AWS Management Console, setting the TCP port to 1723:
3. Use SSH to connect to your Ubuntu server instance on AWS.
4. Now, use vim to open /etc/network/interfaces.d/eth0.cfg.
5. Add the following parameters to configure a GRE tunnel. You’ll need to substitute actual IP addresses for the items in bold.
auto tun1

iface tun1 inet static

address Customer Private IP

netmask 255.255.255.252

pre-up iptunnel add tun1 mode gre local AWS Internal IP remote Incapsula Public IP ttl 255

up ifconfig tun1 multicast

pointopoint Incapsula Private IP

post-down iptunnel del tun1
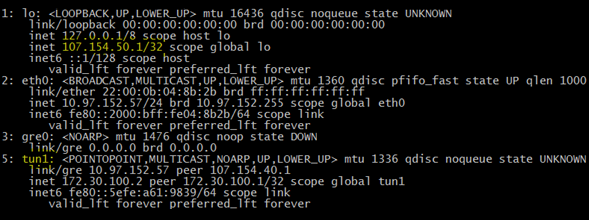
See the screenshot above for an example of an AWS Internal IP
6. After finishing the configuration, press esc :w! to save the file.
7. Bring up the tunnel with the following command:
sudo ifup tun1
8. After bringing the tunnel up verify it is operational by pinging Incapsula Private IP.
Deploying IP Protection
9. Next, you must configure the new Incapsula Protected IP on the loopback interface of your Ubuntu instance. This step is mandatory.
sudo ip addr add Incapsula Protected IP dev lo
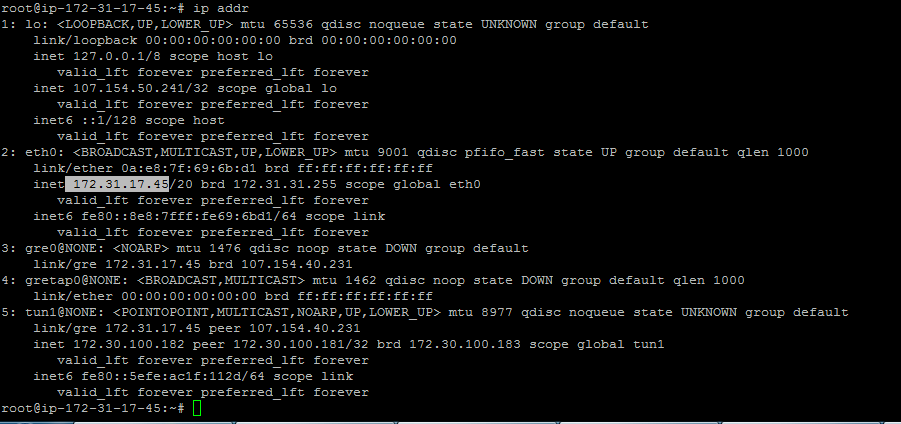
10. Finally, confirm that you’ve successfully started the service and correctly configured all interfaces by issuing the following command:
ip addr
Check the output against the following example, paying particular attention to the items that we’ve highlighted in yellow.
Note: In the preceding example output, 107.154.50.1/32 represents “Incapsula Protected IP” .
11. In AWS we can only do symmetric routing, therefore configure policy-based routing to ensure symmetric traffic flow. With symmetric traffic flow, traffic that Incapsula routes to your Ubuntu instance through the GRE interface must return through the GRE tunnel interface.
In this case, we’re configuring the Ubuntu instance so that only traffic arriving on the tun1 interface is routed back to Incapsula. All other traffic is routed via your instance’s local link—the default route. Apply the following commands to the Ubuntu machine.
ip route add default via "Incapsula Private IP" dev tun1 table 1

ip rule add from "Incapsula Protected IP" tab 1 priority 500
Important
Add the commands from steps #7, #9 and #11 listed above to the /etc/rc.local script on your Ubuntu instance so that it runs each time you start the instance as shown below. Use vim to open the /etc/rc.local and add the following commands.
sudo ifup tun1

sudo ip addr add Incapsula Protected IP dev lo

ip route add default via Incapsula Private IP dev tun1 table 1

ip rule add from Incapsula Protected IP tab 1 priority 500
Press Esc:w! to save the file.
That completes your configuration. From this point, you can ping the server and start seeing traffic routed through Incapsula. If you have any questions, please let us know in the comments below.
Try Imperva for Free
Protect your business for 30 days on Imperva.