

Amazon Web Services (AWS) can host just about any computing need you can think of, but by itself is not a robust protection or optimization platform for your hosted applications. Imperva Incapsula adds cloud-based application delivery services that protect and optimize your applications on AWS. There are three facets to the Incapsula solution for AWS:
- Web protection
- DDoS protection
- Load balancing
This article shows you how easy it is to set up Incapsula web application firewall (WAF) for advanced protection of your hosted web sites.
Web Application Firewall
The Incapsula WAF provides enterprise-grade defense of your AWS-hosted applications. By using sophisticated traffic inspection technology and crowdsourcing algorithms, together with a custom rules engine (IncapRules), backdoor protection, and two-factor authentication, Incapsula provides protection from any hacking attempt. The Incapsula WAF is Payment Card Industry (PCI)-certified and handles all types of threats, including the Open Web Application Security Project (OWASP) Top 10 list.
You configure Incapsula’s web protection by routing your traffic through Incapsula’s globally distributed network of cloud servers. The Incapsula servers profile your inbound web traffic in real time, letting through legitimate traffic while blocking the latest web threats.
Onboard Your AWS-hosted Website
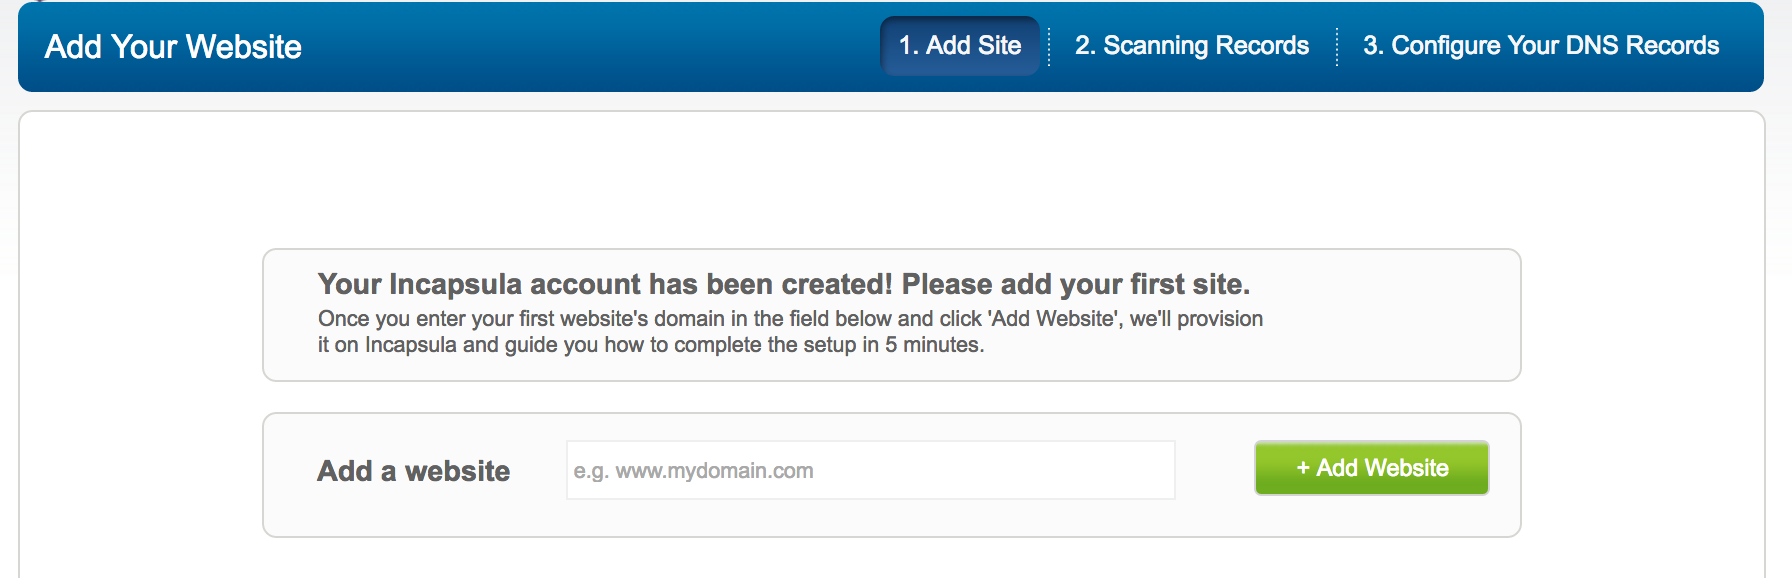
- Go to https://my.incapsula.com .
- If you haven’t yet set up an account, click the Sign up link, and then choose a plan and complete the registration process. Otherwise, enter your email address and password, and then click Sign in.
- Under Add Your Website, enter the full domain name of your site, including the subdomain prefix, such as www.
![]()
- Click Add Website, and then wait while Incapsula’s onboarding wizard scans your site’s records. When finished, you’ll see a window similar to this:
![]() Incapsula checks whether your site uses HTTPS for secure communication. If it detects HTTPS, you’ll need to request an Incapsula certificate and configure Secure Sockets Layer (SSL). For details, see Onboarding a Site – Web Protection and CDN.
Incapsula checks whether your site uses HTTPS for secure communication. If it detects HTTPS, you’ll need to request an Incapsula certificate and configure Secure Sockets Layer (SSL). For details, see Onboarding a Site – Web Protection and CDN.
 Incapsula checks whether your site uses HTTPS for secure communication. If it detects HTTPS, you’ll need to request an Incapsula certificate and configure Secure Sockets Layer (SSL). For details, see
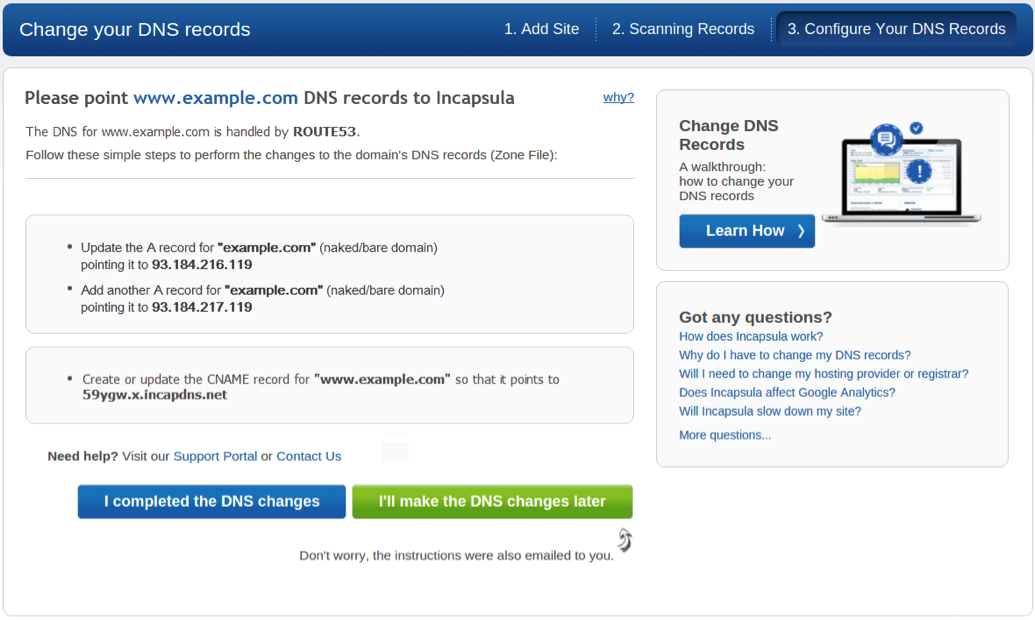
 - Next, you must configure your domain name service (DNS) to route traffic to Incapsula rather than directly to your hosted web site. This step in the onboarding wizard displays a window similar to the following:
A naked domain (bare domain) is simply a domain name without the ‘www’ prefix. If you onboard a naked domain with its www subdomain you’ll need to configure both the A and CNAME (canonical name) records in the DNS.
For a full domain including subdomains “www” will need to get a CNAME.
For “example.com” an A record will be provided
For “www.example.com” a CNAME will be provided.
For “subdomain.example.com” a CNAME will only be provided, no A record will be provided if the subdomain is not “www”

At this point, you’ll need to use your DNS management web page to update your DNS settings. We’ve provided a typical example in the following section. After you have made the necessary DNS changes, return to the onboarding wizard and click I completed the DNS changes.

Change Your DNS Settings
You can configure any DNS server to work with Incapsula, but let’s say you’re using the Amazon Route 53 DNS web service. We’ll also assume that you’ve already performed the other steps needed to onboard your site, as instructed in the previous section, or in the related post Onboarding a Site – Web Protection and CDN.
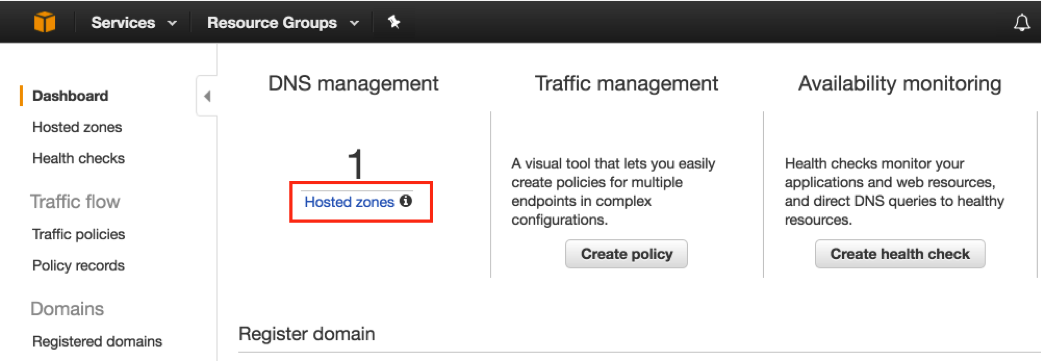
- Log in to the Route 53 management console at https://console.aws.amazon.com/route53/, and then under DNS management, access Hosted zones
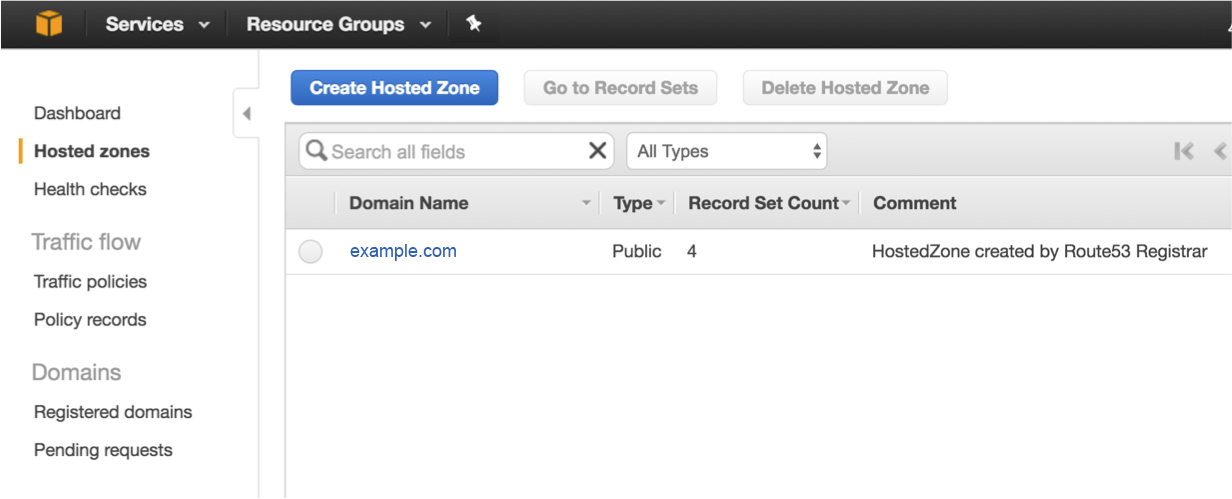
2. From the list or records, select your naked domain (example.com for the purposes of this article).
2b) Select the DNS record set. Note: IP values will change as you’ll be getting unique values during your implementation.
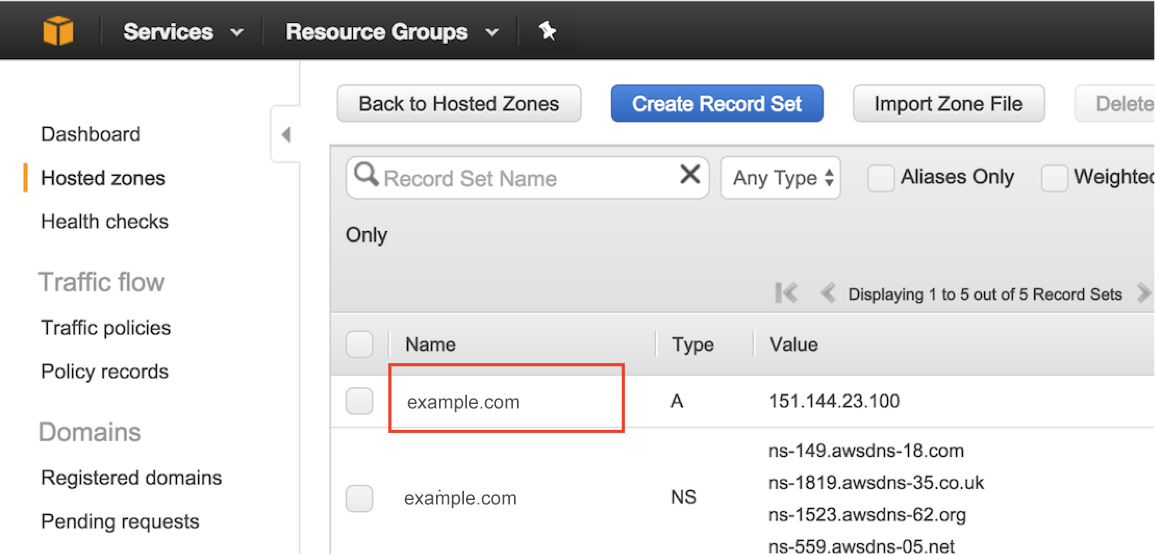
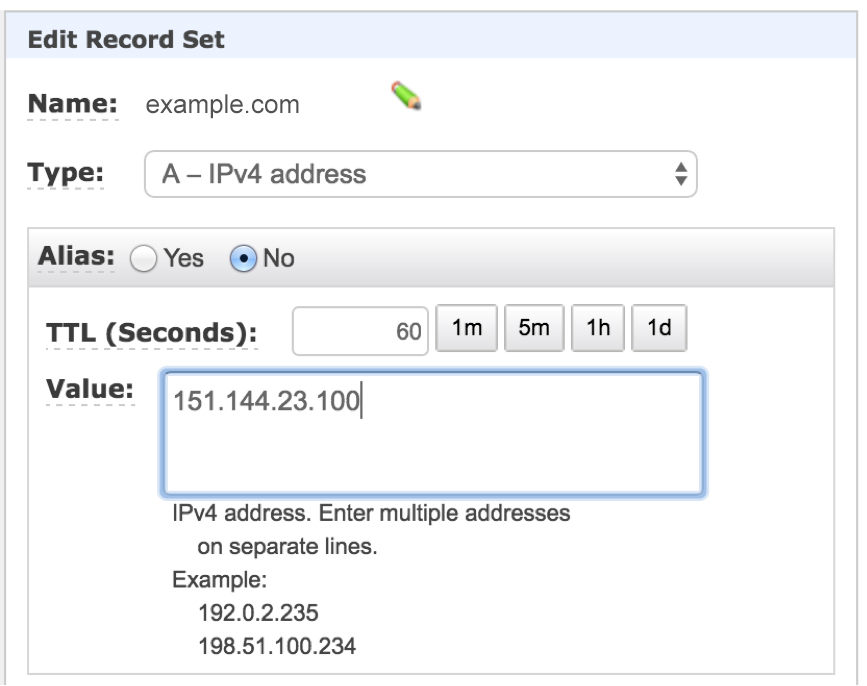
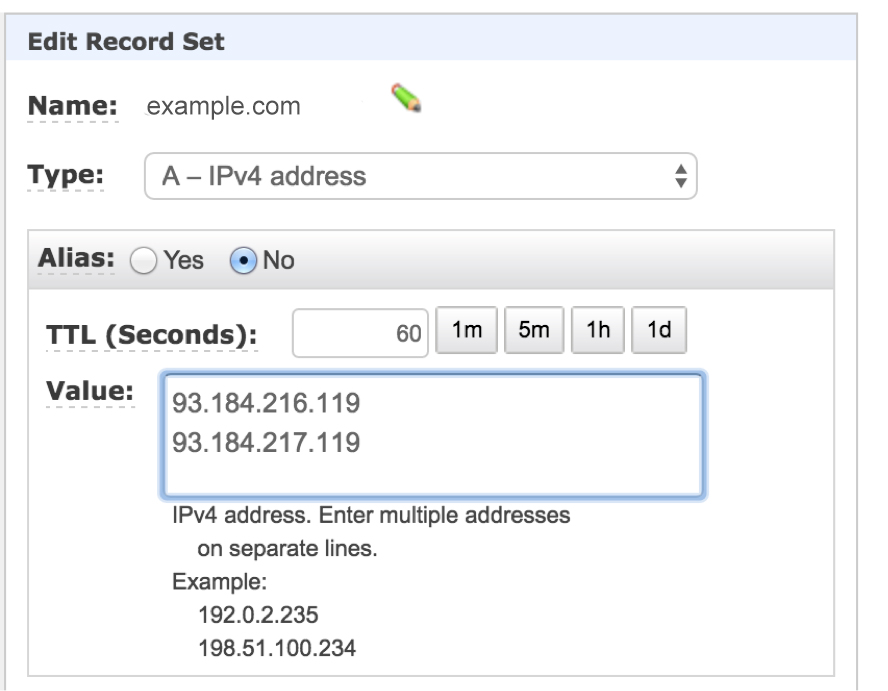
- Edit the record to open it in the Edit Record Set dialog box.
![]()
- From the Type list, select A – Ipv4 address.
- In the Value field, type the two IP addresses listed in the upper box in the Change your DNS records step of the Incapsula onboarding wizard.
- Back in your list of records, select the subdomain that you’re adding to Incapsula. Let’s use subdomain example.com.
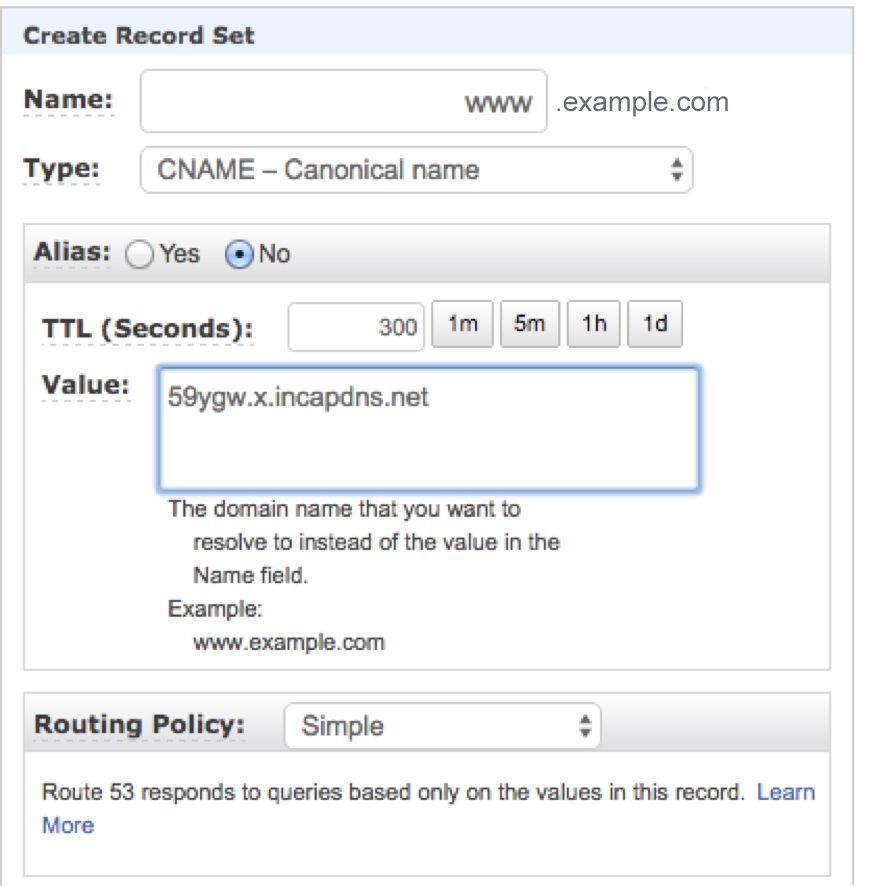
- Edit the record by opening it in the Edit Record Set dialog box.
- From the Type list, select CNAME.
- In the Value field, type the CNAME listed in the lower box in the Change your DNS records step of the Incapsula onboarding wizard. In our example, the Incapsula CNAME is 59ygw.x.incapdns.net.
![]()
- Go back to the Incapsula onboarding wizard and click I completed the DNS changes.
After you have changed your DNS records, traffic gradually gets routed through the Incapsula network as your new DNS records propagate through the Internet over the next several hours. The actual time it takes for all traffic to route through Incapsula depends on the time to live (TTL) settings that are applied to your resource records by the authoritative name server.
You can confirm that your DNS record was changed by using the real time Incapsula dashboard.
Configure the WAF
Now that your site is onboarded, you can configure the protection that Incapsula WAF applies to your AWS-hosted site.
- Log in to your account at https://my.incapsula.com.
- Select the Sites tab in the upper right area of the page.
- Choose your AWS-hosted site, and then click STATS.
- Select the Settings option in the top right corner of the page, and then select WAF in the left navigation panel.
- Configure each of the protection features to meet your needs and threat profile. For each type attack profile, you can define the action for Incapsula to take: alert only, block, add to whitelist, and other parameters.
![]()
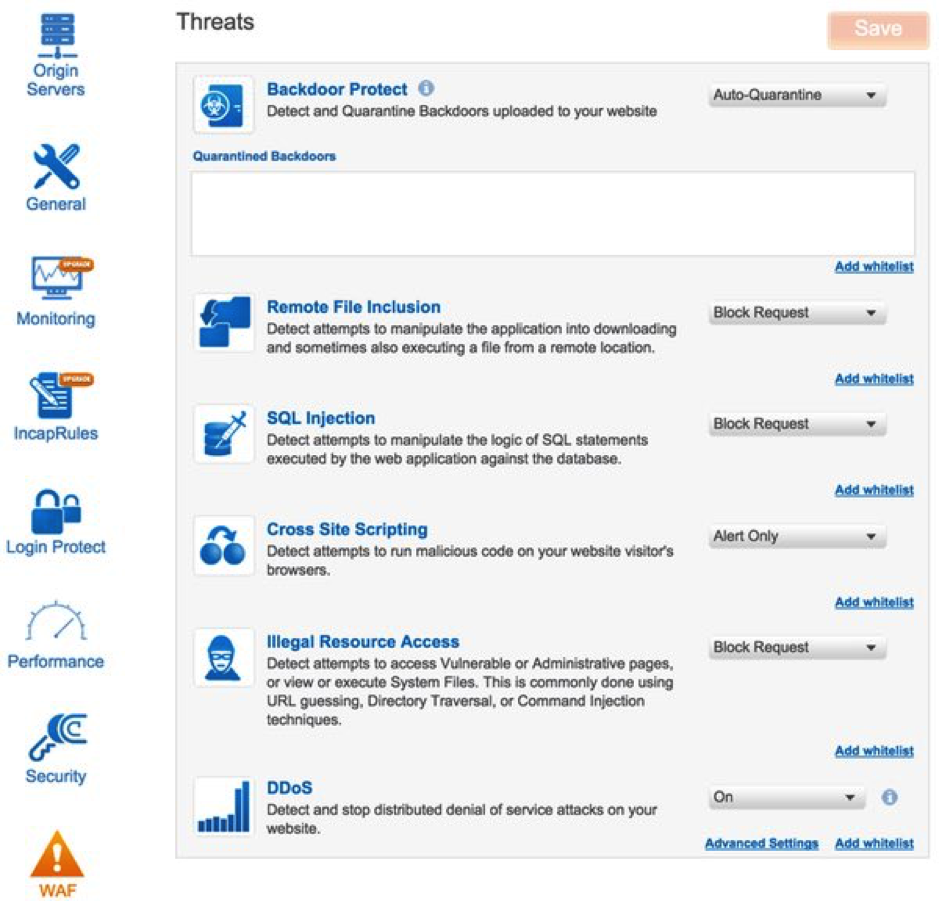
- Backdoor Protect – Detects backdoor code that has been covertly installed on your site by hackers. You can view the backdoor URL to facilitate removal and have Incapsula automatically quarantine the backdoor, blocking access to malicious visitors and bots.
- Remote File Inclusion – Detects attempts to remotely manipulate your web application by exploiting code that runs external scripts in response to user input.
- SQL Injection – Detects attempts to take advantage of non-validated input vulnerabilities to pass SQL code that could be maliciously executed by your web application against a backend database server.
- Cross Site Scripting – Detects attempts to run malicious code on the browser of your visitors’ browsers.
- Illegal Resource Access – Detects attempts to access private or restricted pages, or to view or execute system file through various techniques.
- DDoS – Protects your website against distributed denial of service attacks at all times. Incapsula detects existing and emerging attacks, and triggers DDoS mitigation rules when traffic to your site exceeds a predetermined threshold.
In addition to blocking malicious activities, you can specify whitelists for each protection feature to allow the blocked activity when specific criteria are satisfied. Click the Add whitelist link adjacent to each feature to configure its whitelist. And that concludes your installation of Incapsula WAF.
Have a question about on boarding Incapsula for AWS? Please leave me a comment.
Try Imperva for Free
Protect your business for 30 days on Imperva.